Showing posts with label upcycling. Show all posts

Tuesday, 18 August 2015

Upcycled baby wipes (or whatevs) FO

I've been having fun playing with my new overlocker. And, since Zoe started the whole thing off with her comment about making washable wipes for her daughter with hers, I thought I would make some too. 


An easy first project :-)

Fortunately I had stashed the cut-off sheet edges after making the muslins a couple of weeks ago. I cut the remnants into pairs of squares (eyeballed rather than measured) and serged rounds those edges, using Winnie's tutorial on scarves to work out how to turn the corners (although I notice that I didn't actually follow her instructions at all really, but things turned out okay).

A few minutes later, I had a gratifying stack of 5 smaller, and 5 larger washable wipes to go with that pile of muslins.

The overlocker thing is going really well so far. I even managed to rethread one of the loopers when the thread broke. It was a bit fiddly, but really not too bad. I will just gloss over the small accident that befell one t-shirt that I was trying to repair.  Corners are tricky, it seems, and I managed to make a much bigger hole than the one I was trying to close up.  Oops!

Tuesday, 4 August 2015

Upcycled muslins (FO)


Howdy chaps. 

The other night I got a little bit of sewing time and decided to mop up one of the WIPs on the 'pile'. A wee while ago I found a threadbare sheet softened from many washes, but too narrow for any of our beds. I decided to upcycle into some muslins (or burp cloths for those of a North American disposition).

Easy peasy. Here's what I did:

1. Cut the sheet into squares about 22 inches square (I think).

2. Because the sheet was worn - and had a few thin patches, and because I wanted to end up with something that has a bit of life left in it and can withstand quite a lot more washing, I used two squares for each muslin. I lined two squares up, whizzed around the edges with the sewing machine, leaving 3 or 4 inches open for turning.

3. Turned the two layers, so that the raw seams are on the inside, and finished the muslin with some top stitching to close. 

4. Inspected for thin patches, and darned using a zigzag stitch on the machine. 

5. Tidied up loose threads and press. Folded and admired. [Take pictures for blog*]

6. Gift to expectant friends. 

* optional, obvs.

Clearly, these could have a number of uses, and small ones (about flannel/washcloth size) make good washable baby wipes, or window polishers, or dusters or whatevs. You know it. 

Sunday, 15 February 2015

The easiest cowl in the world (tutorial?)

I promised the other day that I had unvented the easiest cowl in the world, And, here it is. 
It seems completely fraudulent to call this a tutorial, since it is so blinkin' easy. 

Are you ready?

Wait. Before I begin with the tute, I should go back to the beginning of the story. A wee while ago, my dear 8 yr old son asked me for a cowl. He wanted it to wind round his head like a ninja, and asked for one in (navy) blue - that's a school colour since this boy is a model pupil and takes school life pretty seriously. Anyways, I thought: simples - I can knit, so I will knit him a cowl. 

And then Christmas came ... and went ... and there was no cowl. There were not even any beginnings of a cowl. I had yarn, and a pattern (probably), but no time or mojo to fit it into my life.

Fortunately for me, the bean has a birthday every year (who knew?) and this happens to be at the end of January. So, I just let the Christmas cowl thing slide, knowing I had another cowl-gifting opportunity racing towards me. 

I was going to nail this thing. Like a boss.

A day or three before the birthday, there was still no sign of a cowl starting. But, I  had a plan. 

When I was pregnant with little bean, I stole a couple of man sweaters from my husband. He discarded them because they had a weeny hole in one elbow, and he couldn't bring himself to wear them in public (wimp). They were great maternity wear - fine merino wool - long enough to cover the bump, warm and generally very comfy. I carried on wearing them after I stopped being pregnant too - and one of them was just starting to go into holes under the arms. 

A light bulb came on, and I just went with it. (Here's the tute: concentrate)

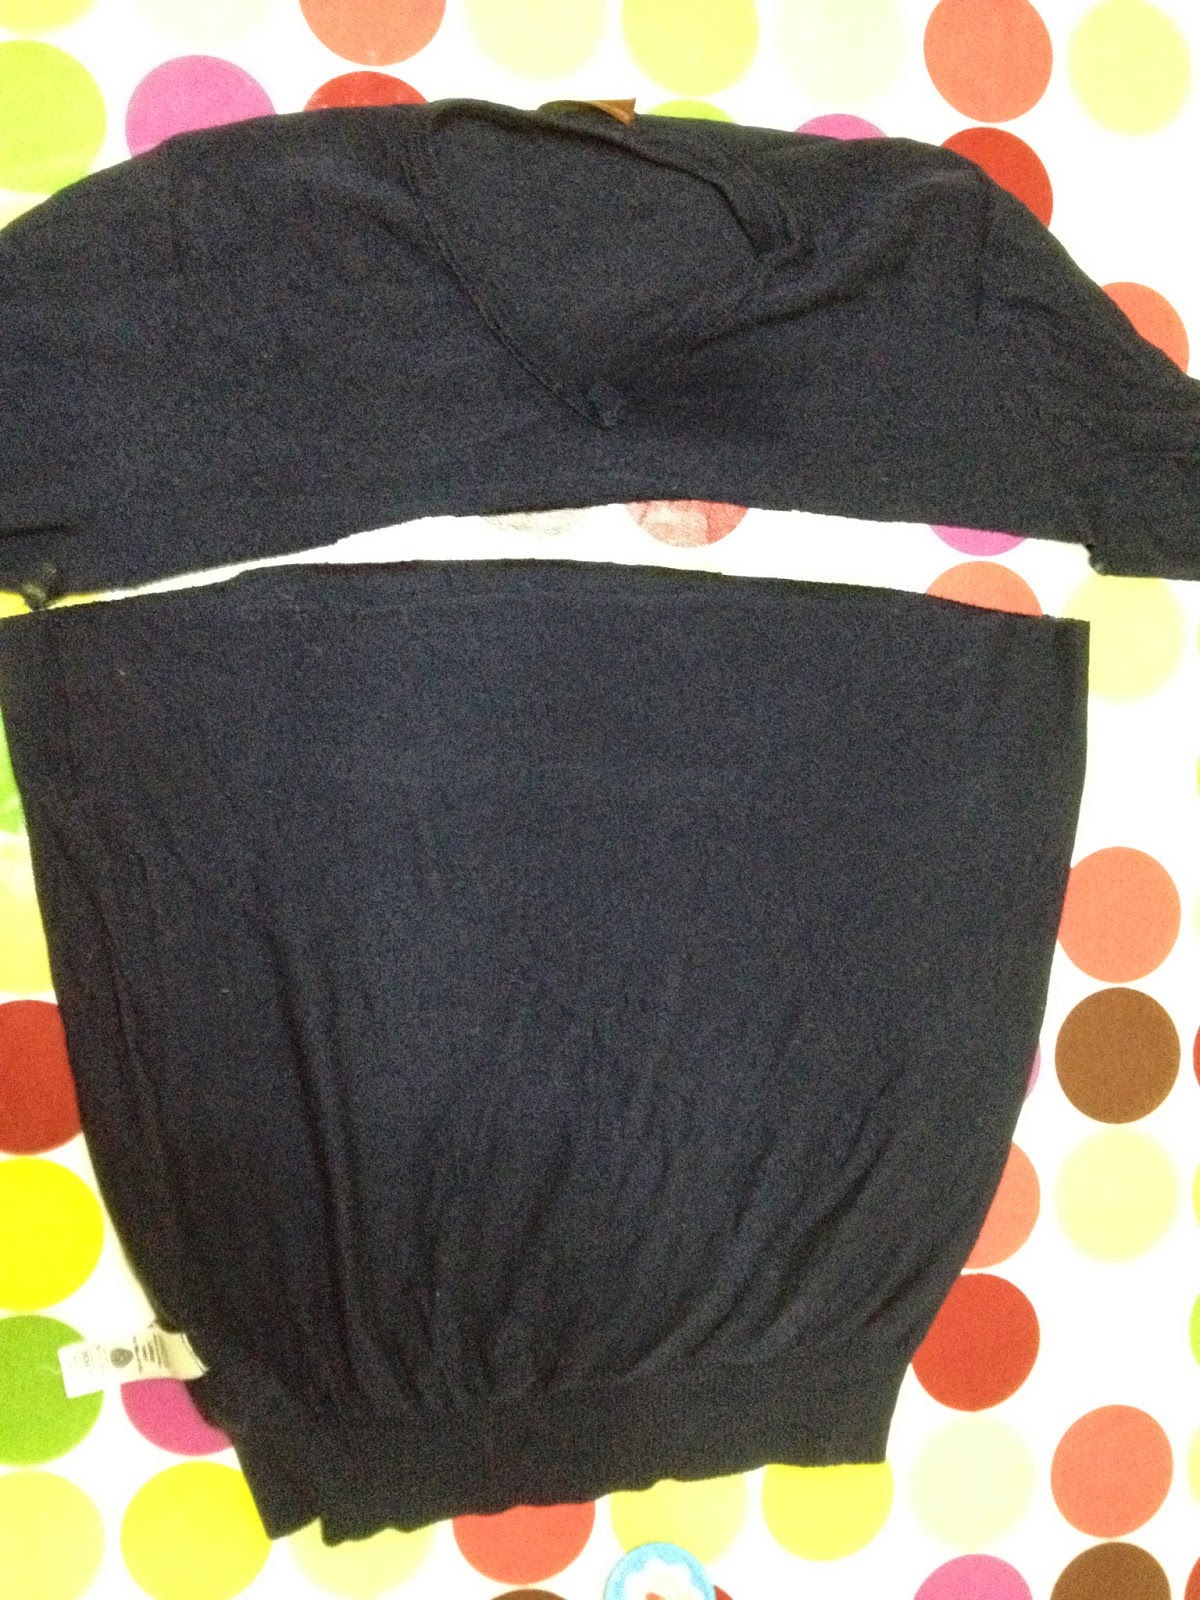
First, I got the sweater onto the slab table. And I started to cut. I cut along two lines: one under the arms, and one above the bottom ribbing


[sorry about the rubbish iphone pictures - I was half way through before I even thought of taking a photo]

Snip, snip went my scissors. 

I was left with a nice tube of stretchy knitted fabric. My plan was then to sew along the cut edges and somehow fold it over and secure it, making a really cosy double layer cowl.

Can you see what is coming next?  Yep. That's right: I didn't DO anything else. I just left it. The edges seemed to be stable enough without stitching (they have rolled), it was nice and stretchy, and I thought the depth of fabric just made it better for ninja poses. 

I styled it on a hanger just to see if it worked. 


[Yeah, navy blue is a total badass to photograph]. A total success, no? 

All I can say is this - I cut off the arms and hem of a man's sweater to make a cowl. And THAT WAS IT. 

It has been worn by the bean, more than a few times. He favours the double wrap. It hasn't fallen apart yet, and I haven't been able to steal it #sadface

Just in case you are wondering: this is a regular fine merino knit (machine washable) from Marks and Sparks. I didn't treat it in any way, e.g. by felting. Job done.


Wednesday, 7 January 2015

Stash Busting New Year Styley (FO)

The New Year arrived at our house along with the spring cleaning and sorting bug. Over the weekend there was a flurry of cleaning, sorting, recycling and general tidying up. 

Several cupboards and bed bases were sorted and organised, and two or three bags of stuff left the house never to return. My daughter's bed base is the home to part (ahem) of my fabric stash. Because I have been making a few things here and there, I thought I might be able to fit another chunk of the stash in there too, and I did my best to make that happen. 

I failed. 

I have quite a lot of nearly worn-out clothes which I have put aside for upcycling into something else. This included a pair of pyjamas of mine in a nice red/grey check with a sparkly. As everyone else in the family was happily occupied, I took the opportunity to upcycle these pjs into something useful.

First I cut the trousers and top into useable pieces of fabric that were roughly square or rectangular. I left hem finishes where appropriate.

Then after a quick iron, I set about making a set of fabric gift bags to add the pile we use for Christmas and birthdays. I have been making these bags for a couple of years now, inspired by Soule Mama. They make wrapping gifts pretty quick - no hunting for paper or tape or scissors - and make tidying up a breeze too: fold up and put back in the box. Easy! 


Wherever possible I used existing hem/edge finishes for the opening of the bags, and I worked with existing seams too, to minimise my sewing effort. I have learned not to make the bags too small, so aimed for something that is at least big enough to fit a novel. I ended up with 7 bags of various sizes.


It didn't make much of a difference to the fabric stash under my daughters bed, but it's a start. One thing dealt with. And, as we didn't have enough fabric bags for all of our Christmas wrapping, it'll be a good addition to that stash...


Wednesday, 26 November 2014

The best present. Ever. (FO)

Last year I made my husband some shoe bags for Christmas, which he declared were The Best Present Ever. High praise, no? Flattery like that gets you everywhere...

He likes them for all sorts of reasons:

:: he has expensive taste in shoes, which he keeps for years decades
:: they don't take up any room in the house
:: they help him keep his shoes shiny and dust free

I like them too, for different reasons:

:: they are really easy to make
:: I made them from the stash
:: they are quick and cheap and have a high appreciation factor

After the raging success if last year's bags, an order was placed for more. Last year I upcycled some unused pillowcases (unused because they were the wrong size/shape for our pillows). This year I homed in on a linen skirt that had been hanging about in the upcycling pile for aaaaages.

It looked promising: a natural fibre in a neutral colour, and after a quick eyeball for size, I calculated that I could cut it up to make two new shoe bags in next to no time.


The first step was to cut the top of the skirt off. Choppity chop.

Then I ripped the central seams of the skirt. Riiiiip.


This left me with two rectangular pieces of cloth, each joined at the side seam and with the original hem. I spent a bit of time looking at the hem deciding what to do with it. I wanted my bags to have drawstrings, so needed a casing to run the strings through.The hem finish seemed to be perfect for this purpose,  so I just needed to sew the side and bottom of the bags together.

For durability and neatness and just because I like it, I used French seams. And, I bagged the bottom of the bags too, to give them a bit of shape.

Finally, I ran some tape through the hem casings to make drawstrings. All in all, a really quick little project. I reckon it was under half an hour, including all the rummaging and ironing. Result.


Monday, 27 October 2014

Sunday tee #update

After yesterday's successful morning crafting I felt fairly pleased with myself. I petted those tees a bit, folding and refolding them and admiring my own handiwork.

Just before tea time I decided that it was time to put the tees away. As I laid the smaller tee in the cupboard I gave the oh-so-neat neckline an exploratory stretch. Hmm.

Would
It
Go
Over

The little bean's head?

I held my breath and tried. It stretched satisfyingly
streeeetch
but
Did
Not
Fit

Double curses.

I haven't decided whether to give the tee to someone with a smaller head (little beans noggin is on the big side) or redo it. Sigh.


Sunday, 26 October 2014

Sunday tee (FO)

Crafting is a rare luxury at the moment, just because my energy and time is sooo limited. The other night I  had to rustle up a plain black tee-shirt for the bean's school dance show (we had tried and failed to buy one, and were running out of time). While the machine was on the table I took the opportunity to stitch up one of those raglan tees I cut out a couple of weeks ago.

This morning, while little bean had a nap and the jelly bean got on with some Halloween crafting, I managed to finish the neck of that little tee.  It was the first time I had successfully attempted to apply a neckband to a knit/t-shirt. There have been a few previous fails, but this time I read a tutorial that made sense to me, and I gave it a go.

We'll just gloss over the slight wrinkle which is - of course - At. The. Front.


Curses.

I also wrangled a neckband onto a plum stretch velvet tee which I made for the jelly bean in August. (And which looks nicer in real life). She took one look at it and said she didn't want it, but changed her mind today when I finished the neck. Again there is a wrinkle at the front, And I have managed to put it on back wards so the seam is also at the front. But, well, someone on a galloping horse probably wouldn't notice, and as these FOS are both upcycled remnants of previous garments I am not mcbothered.


Tuesday, 7 October 2014

Hand-made hand-me down (FO)

A long time ago, when the bean was small I discovered upcycling and refashioning. About then I made him some cute trousers with some of my old clothes - denim with a red stripe and some sweet tucks around the knees. I think the jelly bean might have worn them briefly and then they were passed onto another family with a baby boy to clothe.

Two weeks ago those mama-made toddler trews boomeranged their way back to us. I had sort of forgotten about them, - except for the odd glimpse in a few photos. Then that friend with the baby boy (now aged 4!) gave me a bag of too small boy things for the little bean, and there they were.

They fit the little bean perfectly -  and still have plenty of life left in them. I am putting them on him every chance I get and I'm super proud these hand-made trousers have lasted long enough to become hand-me downs!


Saturday, 27 September 2014

Batch processing #cutting out

Little bean is growing out of things before our eyes. He's got a long back and round tummy (which all 16month olds should have) but it means t-shirts and tops don't fit for long.

Given that I have: 1) a reliable t-shirt pattern in his size and 2) lots of knit fabric in my stash  it seems sensible to whip up a few new t-shirts . This afternoon I managed to cut out fabric for three new tops. I used the fabric from some old t-shirts and outgrown clothes - including a dress belonging to the jelly bean. All in all I used two vests/camis of mine, one dress from the jelly bean,  one t-shirt of mine and part of little worn t-shirt donated by my husband.

I've bundled the cut out pieces together, so they are ready to sew next time I have an hour or two spare.


Friday, 12 September 2014

Pyjama time (FO)

After cutting those pyjama bottoms out in a flash, I stitched them up quickly too. 

I have been devouring sewing blogs over the summer, and absorbed some of the advice about maximising your sewing time from the Coletterie blog. The main thing I did was to work on the three pairs simultaneously - cutting them out in one session, then sitting down to sew as much as possible before getting up again. After only ONE sewing session all three pairs pyjama bottoms were sewn together, and just needed waistbands and finishing!   

I used french seams throughout, and followed a neat tutorial about boxer shorts for the waistbands on the children's pairs. These turned out fabulously, and I slightly regret not doing the same thing on my own pair. 


My pair of pyjama bottoms took a bit longer to finish than the children's as I had to hem the legs. I found this rather lovely bias fold trim in my box of notions. I think it is something I have inherited from my grandmother or my mother-in-law - so I used that. It went on like a dream and looks very pretty! 


I am happy to report that all three pairs of pyjama bottoms were pressed into action immediately. It makes me a very happy mummy/sewist . 


Tuesday, 12 August 2014

Pyjama bonanza

Over the last week I have managed to wear out two (TWO!!) pairs of pyjama trousers. How does that happen?! They weren't even the same make or the same age.

As I'm on a bit of a sewing bee at the moment, I salvaged the usable remnants and (after a quick wash) I cut out two new pairs of pj trousers from the ruins. One pair is for the jelly bean (5 next week!) and the second pair is for the bean - his pair are shorts as that was all I could eke out of the fabric available. 


I used some existing pjs as a template, adding as much length in the leg as I could manage. My children tend on the slim side and just seem to get longer/taller rather than wider as they grow.

While I was cutting out pyjama trousers, and, given that I am down two pairs, I cut out a pair for myself. I used an existing (non-ripped) pair as a template, and cut into some rather fabulous cotton lawn I bought on a whim a year or so back. 


They are going to be rather gorgeous. I did wonder about making a matching top (there is still quite a lot of fabric left), but thought that would be a bit much, particularly as none of my other pyjamas have matching tops! 


Wednesday, 12 June 2013

Little and often

One thing I have learned over the years is that action little and often is no bad thing. Most of my knitting is done this way - a round or two on the bus or waiting for a doctor's appointment.

Now that the little bean is here, this is more true than ever. However, there are lots of things to do, not least of which is to stop fantasising about new projects and finish some of the WIPs piled up here and there.

I managed to grab some time today for more sewing. The third pair of pyjama shorts got some attention, and I quickly rustled up a couple of washable baby wipes.

These wipes are modelled on some fab Imse Vimse wipes a friend passed on to us. I made use of a top I deconstructed the other day because the stitching and fabric were tearing. Two layers of this fine cotton were sewn together to make a thin cloth perfect for washing/wiping a baby's creases.


Tuesday, 4 June 2013

Shortly (FO)

Little bean is taking up most spare moments, as you would expect of a 3 week old baby.  And, to be fair I am trying to savour these baby moments as I know how fleeting they will be....

Yesterday was the first day I managed a stitch of any kind. I got my machine out of the cupboard and finished a second pair of pyjama shorts for the (biggest) bean.

I upcycled them from some pyjama jackets I didn't wear - and which were taking up shelf space in my wardrobe.

As the bean often complains about being hot at night, I thought some short pjs might be a good move. I cut out 3 pairs using some existing pyjama trousers as a template. The first pair were quickly pressed into service, and have been a great hit - and yesterday I fixed the elastic in the second pair.

I'm so pleased with these - they are filling a need and helping me to declutter my wardrobe, and they cost only pennies to make....


Tuesday, 27 November 2012

An autumnal flood

I've been away too long for comfort, and have oodles of news and FOs to share. So, expect a virtual flood of blogging from me. Here's a sneak preview of the things I've been up to...


Wednesday, 18 April 2012

Winging it...

Elsie marley has got her kids clothes make week again next week. Not sure I can manage it, but I like the idea, and have got things going just now by cutting out some new trousers for the bean.


As you can see they are being upcycled from a pair of moleskins which his dad has just put in the 'to go' bag.


Not much left over once I'd finished cutting!


Monday, 28 November 2011

Making Monday: Christmas is coming...

Winter vomiting disease has been and - hopefully - gone in our house now, so normal service is resumed. I'll spare you the details, but suffice to say the washing machine got quite a work out....

Despite it all, there has been plenty of Christmas crafting this year. I don't know why I've started so early, or been so organised about it. Who knows? But - without wishing to boast - the christmas basket is starting to brim with handcrafted goodies all made from stuff I was hoarding  the stash. So far I have made:
  • three pairs of socks (one adult; two child);
  • two men's hankies (upcycled from an old shirt);
  • three quilts for a dolls bed (also upcycled from various shirts and sheets);
  • and one pair of handwarmers.
Here are a few shots of these projects...


In the midst of all this I have also made a pair of socks for my brother's birthday (happy birthday boy!), a cowboy/Woody style waistcoat for a 5 yr old's birthday (happy birthday Digby!) and a baby hat for a newly hatched sister belonging to one of the bean's friends.

Here are the birthday socks...

pattern: generic top down
yarn: German sock yarn, bought at Peebles show in 2010.

You'll have to wait for pics of the other things. The baby hat and socks for the jelly bean will be worth waiting for - they are knit in that fab Berocco sock yarn I had for my birthday. It's gorgeous stuff and I'm just hoping there will be enough left to make some socks for me!

But, now all that's finished, I'm not quite sure what to do next. Someone at work is expecting twins in the new year and I was thinking about making some weeny jackets for them; I've got a Clothkits dress for the jelly bean languishing somewhere, and various plans for dressing up clothes to add to our dressing up basket, plus a friend that I owe a hat .... Any suggestions? Perhaps a glass of sloe gin will help? It can't hurt, can it?

Wednesday, 6 October 2010

Tutorial: Dribble Bib (aka Bibble)

It seems that the height of bib fashion (who knew there was such a thing as bib fashion?!) is currently a triangular neckerchief with a popper fastening, and which snuggles beneath the chin to catch the dribble that flows from teething babies/toddlers.


You can find oodles of these dribble catchers in the shops, including some very fancy ones with waterproof innards and velour layers, although they do cost anything up to £8 each! But they are a doddle to make from recycled/upcycled fabrics and here's a short tute to prove it.


You will need:
  1. some thin card to make a template
  2. some absorbent fabric for the backing (e.g. terry, towelling or fleece)
  3. some fabric for the top (e.g. t-shirt material, dress fabric)
  4. press stud or fastener
  5. scissors/thread/needle

1. Using an old bib as a guide for neck length, make a template for the bib using the card. You will need to draw a right angle triangle with a long edge that corresponds to your old bib (in my case, measuring approx 40cm/15").


 2. Use the template to cut backing material. Here I am using a well used bamboo terry square.


3. Use the template to cut the fabric for the top of the bib. Here I am using a plain (but rather bright!) t-shirt...


4. Next stitch the two layers of fabric together. Because I am not a very accomplished sewer, I simply topstitch about 1/4" from the edge, leaving the edges raw. Alternatively you could zigzag or overlock the raw edges together OR sew together with right sides facing (leaving a short gap) and then turn right sides out and finish by top stitching. If you are making these as a gift, then you might also consider finishing with bias tape to make them really neat.


5. Add your fastener/popper at the appropriate places. Some of the commercial bibs have two poppers so that length can be adjusted.


6. Add bib to baby and smile.